Expert Advice for Affordable Solder Paste Stencil Solutions

You can get affordable solder paste stencil solutions by making smart choices. Experts say you should balance cost, quality, and reliability. The printing process is very important. Most problems happen during this step. You need to match your equipment, materials, and design. Think about what your PCB needs before you decide. Use optimization to cut waste and get better results. Follow these expert tips:
Pick design options that fit your project needs.
Choose materials that are in your budget and last longer.
Change your process to lower mistakes and save money.
Key Takeaways
Pick the right stencil design for your PCB. This stops errors and saves money.
Choose materials carefully. Stainless steel works for most jobs. Nickel is good for big projects or tiny parts.
Adjust stencil thickness for the smallest parts on your board. This helps solder paste go on right and lowers mistakes.
Keep your stencil clean and take care of it. Cleaning often makes it last longer and helps prints look better.
Work with suppliers for good prices and tips. Having a good relationship can save money and make stencils work better.
Solder Paste Stencil Design & Cost Factors
Key Cost Drivers in Stencil Design
The way you design your solder paste stencil affects cost and how well it works. If you know what makes the price go up, you can make better choices. The table below lists the main things that change the price and how hard the design is:
Cost Driver | Description |
|---|---|
Technological Advancements | New materials and methods help you finish work faster and easier. |
Regulatory Compliance | Following rules can make stencil design harder and cost more money. |
Increasing Complexity of PCB Designs | Boards with more details need more accuracy, so the stencil costs more. |
Automation Adoption | Using machines means you need special stencils, which can be expensive. |
Miniaturization of Components | Tiny parts need very exact stencils, so the price goes up. |
You should check these cost drivers before you start your stencil design. Each one can change how much you pay and how well your stencil works. For example, if your PCB has small parts, you need a very accurate stencil. This costs more, but it helps you get better results.
Stencil thickness is also important. Thick stencils give more solder paste, which is good for big parts. Thin stencils work better for small circuits. If you pick the wrong thickness, you might waste solder paste or get bad solder joints. You can stop these problems by matching the stencil thickness to the smallest part on your board. This helps you control solder paste and makes your assembly better.
If you pay attention to these details, you can stop printing mistakes and spend less fixing problems. A good stencil design saves money and helps your solder paste stencil work better.
Balancing Quality and Affordability
You want to spend less money, but you also need a good stencil. The best way is to make smart design choices. Here are some ways to help:
Make your aperture design better so solder paste spreads evenly.
Use the same stencil designs for different boards. This saves time and lowers mistakes.
Work with suppliers to pick the best materials and methods. Laser-cut stencils and nano-coatings can make your stencil last longer and work better.
Tip: Always ask your supplier about your project needs. They can help you find the best way to balance cost and quality for your stencil design.
Remember, every choice changes the price and how well your stencil works. If you know the main cost drivers and use good strategies, you can make a stencil that fits your budget and works well.
Aperture & Thickness Design
Optimizing Aperture Size and Aspect Ratio
When you design a solder paste stencil, you must watch aperture size. The right aperture helps control how much solder paste goes on the pad. It stops problems like bridging or open circuits. If the aperture is a little bigger than the pad, about 2 to 4 mils, solder paste comes out better. Always check the area ratio. Keep the area ratio above 0.66. This helps solder paste transfer and lowers defects.
Aperture design rules say the aperture shape should match the pad shape. For example, use a rectangle aperture for a rectangle pad. Think about the aspect ratio too. If the aspect ratio is above 1.5, solder paste flows out easier. This cuts waste and makes your assembly stronger.
Make the aperture size just a bit bigger than the pad.
Keep the area ratio above 0.66 for good solder paste release.
Match the aperture shape to the pad shape.
Use an aspect ratio above 1.5 for better paste transfer.
Note: If you make aperture size and aspect ratio better, you do less rework and waste less material. You get steady solder joints and save money on repairs.
Selecting Stencil Thickness for Cost and Quality
You need to pick the right stencil thickness to control solder paste volume. Thickness decides how much solder paste goes on each pad. If the stencil is too thick, you get too much solder paste. This can cause bridging or tombstoning. If the stencil is too thin, you may not get enough solder paste. This can cause open circuits.
Industry standards like IPC-SM-840C help you pick the best thickness. These standards make sure you get enough solder paste on every pad. They also keep paste from going where it should not. Start with a baseline thickness. For most surface mount boards, use 0.125 mm. For fine-pitch parts, use 0.10 mm. For big parts, use 0.15 mm or more.
Here is a table that shows common stencil thickness and their uses:
Stencil Thickness (mm) | Typical Applications |
|---|---|
0.10 | Fine‑pitch QFPs, 0201/01005 chips, micro‑BGAs |
0.125 | General‑purpose SMT, 0402/0603 components |
0.15 | Medium‑pitch ICs, standard connectors |
0.175 | Large BGAs, mixed‑technology boards |
0.20 | Large passives, power connectors |
0.25 | Power components, through‑hole paste‑in‑hole |
Follow these steps to pick the right stencil thickness:
Find out what parts you have. Are they fine-pitch, standard, or big/power parts?
Check pad and aperture ratios. Make sure the aspect ratio is at least 1.5 and the area ratio is at least 0.66.
Start with a baseline thickness. Use 0.125 mm for most boards, 0.10 mm for fine-pitch, and 0.15 mm for big parts.
Test and check. Print test boards, look at solder joints, and adjust thickness if needed.
Use stepped stencils for mixed boards. Multi-level thickness helps balance solder paste in all areas.
Stencil thickness changes how much solder paste goes on and how strong your solder joints are. Thick stencils hold more paste, which is good for big parts. Thin stencils work better for fine-pitch parts. Even small changes in thickness can change solder paste volume and affect solder joint quality.
For fine-pitch parts, use 3 to 4 mils thickness to avoid too much solder paste.
For BGA parts, use 5 to 6 mils thickness for enough paste.
If you use too little paste, you get open circuits. If you use too much, you get bridging and tombstoning.
Tip: Always check stencil thickness and aperture design before you start production. This helps you avoid mistakes and keeps solder joints strong.
If you follow these aperture design rules and pick the right stencil thickness, you get better solder paste placement, less rework, and waste less material. You get better results and save money in your assembly process.
Stencil Materials & Coatings
Choosing Cost-Effective Materials
You should pick the best stencil material for your project. The material you choose changes how much you spend and how long your stencil lasts. Stainless steel and nickel are the most used materials for solder paste stencil design. Stainless steel is strong and does not cost a lot. Nickel costs more at first, but it lasts longer and gives you fewer problems later. This means nickel can save you money over time.
Here is a table to help you compare:
Material | Durability Impact | Cost Implications |
|---|---|---|
Stainless Steel | Needs fewer replacements | 40-60% lower fabrication expense |
Nickel | Lasts longer, has fewer defects | Higher price at first, but better value later |
If you want to spend less, stainless steel is good for most projects. If you need a stencil for lots of solder paste printing or tiny parts, nickel might be better. Always pick the material that fits your design and how many boards you will make.
Advanced Coatings for Long-Term Savings
You can make your stencil work better by using special coatings. These coatings help you get better solder paste printing and clean your stencil less often. Nano-coatings make a layer that stops solder from sticking to the stencil walls. This helps more solder paste go through each time and keeps your work going well.
Here are some features of advanced coatings:
Feature | Description |
|---|---|
Less cleaning needed | Helps stop problems like not enough paste and solder balls. |
Better paste transfer | Lets you print more boards before cleaning the stencil. |
Very strong | Can last up to 25,000 prints and you can add more coating later. |
Stays clean | Does not mix with flux or solder paste. |
Better print quality | Makes printing small apertures easier and faster. |
“Excel has over 255 product stencils using the MicroGlide Nano-Coating in a high-production facility. We love the paste release! Depending on our customer’s order, it is probably safe to say the MicroGlide Platinum stencils will outlive the life of the product.” – Stefan C., Excel Electronics, Inc.
You can pick from different advanced coatings like BluPrint PVD, Advanced Nano, and NanoSlic Gold. These coatings help you move more paste and clean less, sometimes up to 300% less. In big factories, nano-coated stencils can help solder paste come off up to 30% better than stencils without coating. This means you get fewer problems, less fixing, and save more money as you use the stencil.
When you pick the right stencil material and coating, you make your solder paste stencil design better. You also save money and get better results every time you print.
Cutting Costs with Step Stencils & Alternatives
When to Use Step Stencils
Step stencils are helpful when your PCB has big and small parts. They let you control how much solder paste goes on each part. This makes building your board easier and helps stop problems like too much or too little paste. Step stencils are best for boards with many types of parts. You get stronger solder joints and fewer mistakes, which saves time and money.
Here is a table that explains why step stencils can save money for some designs:
Benefit | Description |
|---|---|
Improved Solder Joint Reliability | Makes solder joints fail less, up to 30% better than regular stencils. |
Reduced Defects and Rework | Cuts down on mistakes like too much paste, saving time and effort. |
Compatibility with Mixed Tech | Works with both surface mount and through-hole parts, making assembly easier. |
Cost-Effective for Complex Designs | Costs more at first, but you save money later by having fewer mistakes and better results. |
Step stencils help you put the right amount of solder paste on each spot. They are good for boards with tiny parts close together. They also work well for boards with lots of different parts. But, step stencils cost more to make and take longer to get. You need to plan carefully to get the best results.
Alternatives for Cost Reduction
There are other ways to spend less on solder paste stencils. Some choices are good for testing or making just a few boards. You can make your own stencils using chemical etching, laser cutting, or even simple things like mylar or soda cans. These ways help you save money, especially for quick jobs.
DIY solder paste stencils: Use chemical etching or laser cutting to make detailed shapes.
Mylar stencils: Good for people making a few boards or for hobbies.
Nickel stencils: Last longer and cost less for making many boards.
Polyimide stencils: Work well when you need to handle high heat.
Laser-cut stencils cost less and are faster to get than electroformed stencils. They also let you control the size of the holes, which helps with putting paste in the right place. Solder paste jetting is another way to put paste on, but it does not work for every job.
Tip: Pick the stencil that fits your board and how many you need to make. This helps you save money and still get good solder joints.
Maintenance & Reuse Strategies
Cleaning and Handling for Extended Life
You can make your solder paste stencil last longer by cleaning it well. Clean the stencil after every print. This stops buildup and keeps solder paste even. Use soft brushes or ultrasonic cleaners to clean the aperture. Pick cleaning solutions that work with the stencil material. Do not use strong chemicals because they can hurt the stencil. Automated cleaning machines help keep the stencil clean every time. Check the stencil for damage after cleaning. Always use gloves and the right tools to handle the stencil. This keeps dirt and oil away. Make sure the stencil is lined up before printing. This stops uneven solder from happening. Store the stencil in a dry, clean place. Keep humidity low and temperature steady to stop rust. Use covers or cases to protect the stencil from scratches and dirt. Label and organize stencils so you do not mix them up or bend them.
Regular care makes print quality better. Clean stencils help put solder paste in the right spot and cut down on mistakes. You save money because you do not need to buy new stencils as often. Production is smoother with fewer problems from dirty stencils.
Practice | Benefit |
|---|---|
Clean after each cycle | Stops buildup |
Inspect for damage | Keeps stencil strong |
Store properly | Stops rust and scratches |
Safe Reuse Without Quality Loss
You can reuse a stencil if you follow rules to keep it working well. Put enough solder paste for a smooth roll when printing. Add fresh solder paste in small amounts at the right time. This keeps the paste working right. Start the SMT process soon after printing so the paste does not dry out. Use an under stencil cleaner that matches the stencil instead of isopropyl alcohol. Clean leftover solder paste often to help the stencil last longer.
There are risks with reusing stencils. Too much solder paste can cause bridges and short circuits. Blocked apertures make weak solder joints. Leftover paste can cause parts to be placed wrong. Paste taken from the stencil should not be used as new paste. Heat, humidity, and dirt can change how the paste works. Before using old paste again, check how long it has been out and if it still works as the manufacturer says.
Automated cleaning machines can cut defects by up to 40%. A clean stencil helps solder paste move smoothly and lowers problems like bridging, not enough solder, and parts not lining up.
You keep your solder paste stencil safe and your design strong by following these cleaning and reuse steps.
Component-Specific Design Tips
Fine-Pitch and Micro-BGA Solutions
You must be careful with fine-pitch and micro-BGA parts. These parts need special design to stop mistakes and save money. Follow rules like IPC-7525 for good results. Change stencil apertures for each part to get better solder. Use standard stencil thickness if you can. This saves money and keeps things easy. Pick common aperture shapes for most pads. This makes building faster and simpler. If your board needs different thickness, use a stepped stencil.
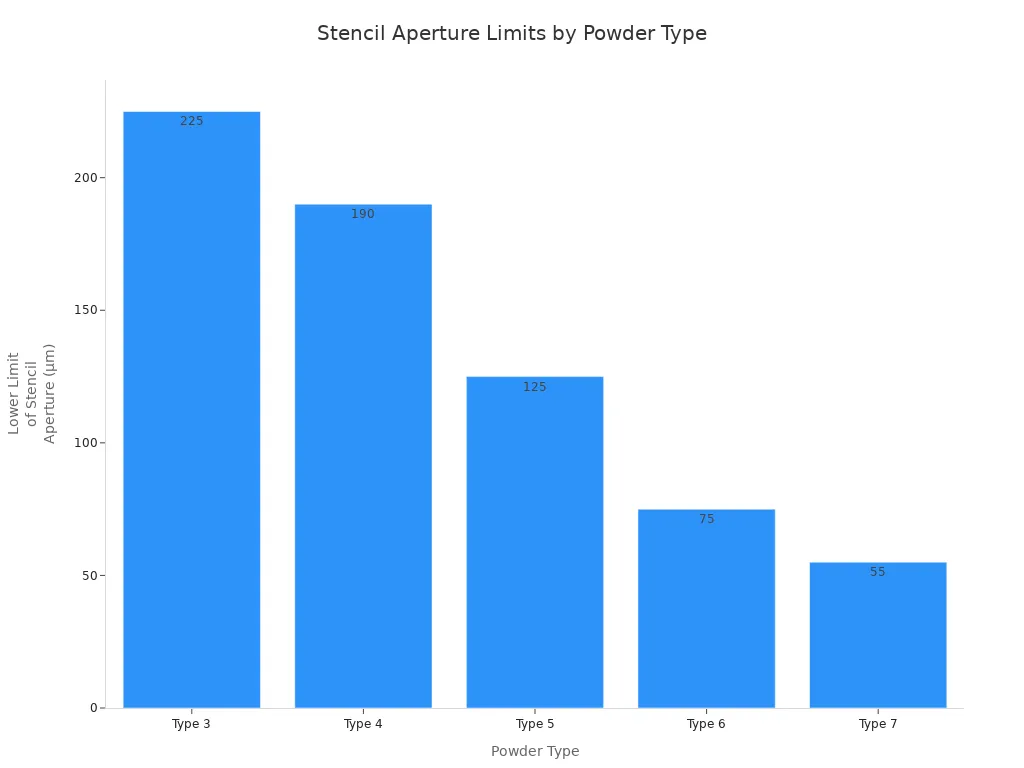
Here is a table showing powder types and the smallest stencil aperture size:
Powder Type | Lower Limit of Stencil Aperture Diameter (µm) |
|---|---|
Type 3 | 225 |
Type 4 | 190 |
Type 5 | 125 |
Type 6 | 75 |
Type 7 | 55 |
Thin stencils are best for fine-pitch and micro-BGA parts. You get better solder and fewer mistakes. Special stencil designs help control solder paste amount. This stops bridging and helps you get more good boards. For example, a 0.12mm thick stencil fits a 0.15mm pad well. Using 304 stainless steel makes the stencil strong and accurate. You save money when making lots of boards because you fix less.
Large Aperture Cost Considerations
Large apertures need careful planning for each part. The shape of the aperture changes how much solder paste you use. This can change how much you spend on materials. Pick the right stencil material for your board. Stainless steel works for most jobs and costs less. Change stencil thickness to fit your parts. Thick stencils can waste solder if not designed right.
Keep high accuracy when making stencils. This stops mistakes and saves money from fixing or throwing away boards. Paste mask design controls how much solder paste goes on each pad. Too much paste causes bridging and shorts. Too little paste causes cold joints or open connections. Change paste masks in crowded areas to make spacing and accuracy better. Use windowpane or split apertures for big thermal pads or power parts. These changes help you waste less material and get better solder joints.
Tip: Always check your stencil design for both fine-pitch and large aperture spots. This helps you avoid expensive mistakes and keeps your board strong.
Avoiding Costly Mistakes in Solder Paste Stencil Design
Over-Specification and Tolerance Issues
You can lose money if you pick the wrong stencil. Some people choose stencils that are too thick or too thin. If your stencil is too thick, you get too much solder paste. This can cause solder balls and short circuits. For example, a 0.2mm stencil for a 0.5mm-pitch BGA gives extra paste and problems. If your stencil is too thin for a QFN package, you do not get enough solder paste. This makes the joint weak and easy to break.
Aperture size is important too. Make aperture sizes 10-20% smaller than the pad. This stops solder from spreading too far and causing bridges. If you skip these rules, you spend more money fixing mistakes and buying new boards.
Tip: Always check stencil thickness and aperture size before production. This helps you avoid expensive errors and keeps solder joints strong.
Here is a quick list of common mistakes:
Using a stencil that is too thick for fine-pitch parts
Using a stencil that is too thin for big parts
Making aperture sizes too big, which causes solder bridging
Following Manufacturer Guidelines
You can stop expensive mistakes by following manufacturer guidelines. Start by checking the standard for your project. Look at plans or DOT handbooks to make sure you meet requirements. Measure letter height and style to match approved alphabets. Check word layout for correct order and spacing.
Review the material and thickness of your stencil. Pick thicker plastic if you want to reuse the stencil often. Ask your supplier for a drawing with measurements. This helps you get the right size. Match the stencil size to the board shape for a good fit. Make sure your stencil works with the solder paste you use.
Ask your vendor for help with documents and quick replacements. This keeps your production running well. If you follow these steps, you make fewer mistakes and save money.
Step | Action |
|---|---|
Confirm standard | Check project plans or handbooks |
Measure letter height/style | Make sure you follow the rules |
Review layout | Check order and spacing |
Check material/thickness | Pick for reuse and strength |
Request drawing | Get the right measurements |
Match size | Fit stencil to board shape |
Confirm compatibility | Use the right solder paste |
Vendor support | Get documents and replacements |
Note: Following guidelines helps you get strong solder joints and keeps your costs low.
Collaborating with Suppliers to Cut Costs
Leveraging Supplier Expertise
You can spend less on solder paste stencils by working with suppliers. Suppliers know how to make stencils fit your needs. If you talk to manufacturers with good supply chains, you get special deals. These deals help you pay less for each stencil. You can ask for better payment plans and order more at once. This gives you more ways to save money.
If you keep working with the same supplier, you get better prices. Suppliers give advice about stencil materials and coatings. They help you pick the right stencil for your board. You get tips to make solder paste release better and waste less. Suppliers can suggest changes to help your stencil last longer. You save money and get stronger solder joints.
Work with suppliers who have strong supply chains.
Ask for better payment plans and bigger orders to save more.
Keep a good relationship for better prices and help.
Tip: Ask your supplier about new stencil materials or coatings. These can help you print more boards and clean less.
Bulk Orders and Standardization
Buying stencils in bulk helps you spend less. You pay less for each stencil when you buy many at once. If you use the same stencil design for different boards, ordering is easier. You can use one stencil for many projects. This means you need fewer unique stencils.
Suppliers often give discounts for big orders. You get faster delivery and better service. Using the same stencil design helps keep your process steady. You waste less solder and spend less time fixing mistakes. Here is a table showing how bulk orders and standard designs help:
Strategy | Benefit |
|---|---|
Bulk Orders | Lower price for each stencil |
Standardization | Fewer unique stencils needed |
Consistent Process | Less solder waste |
You can ask your supplier about prices for big orders and standard stencils. This makes your solder paste stencil process easier and cheaper.
You can achieve affordable solder paste stencil solutions by making smart choices. Focus on the right stencil design, material, and thickness. Always match the stencil to your solder needs. Clean and reuse your stencil to save on cost. Work with suppliers for the best results.
Remember: Good solder joints start with the right stencil and careful planning. Apply these tips and talk to your supplier for more savings.
Review your stencil design before production.
Test solder paste release on your board.
Keep your stencil clean for strong solder joints.
FAQ
What is the best material for a solder paste stencil?
You should use stainless steel for most projects. It costs less and lasts a long time. Nickel works better for fine-pitch parts or high-volume jobs. Pick the material that matches your board and budget.
How often should I clean my stencil?
You should clean your stencil after every print cycle. This keeps the apertures clear and helps you get good solder joints. Regular cleaning also makes your stencil last longer.
Can I reuse a solder paste stencil?
Yes, you can reuse your stencil if you clean and store it well. Always check for damage before each use. A clean, undamaged stencil gives you strong solder joints.
How do I choose the right stencil thickness?
Check the smallest part on your board. Use 0.10 mm for fine-pitch parts and 0.125 mm for most boards. Thicker stencils work for large parts. Test and adjust if needed.
What should I do if solder paste bridges or skips pads?
Check your aperture size and stencil thickness. Make sure you clean the stencil well. Ask your supplier for help if problems continue. Good design and regular cleaning fix most issues.
See Also
Essential Aspects Of Solder Paste Quality Control In SMT
Understanding Solder Paste Types And Component Variations In SMT
Determining The Right Time For Lead-Free Solder Paste Use
