Top Tips for Cutting Costs with Solder Paste Stencil Design

You can save money on solder paste stencil design if you make smart choices early. You do not have to lose quality. Good design is important for saving money and getting good results in PCB assembly. The material you choose for your stencil matters a lot.
Stainless steel is a smart pick for big jobs because it is cheap.
Electroformed nickel costs more, but it works better for small parts and can make more good boards by up to 20%.
You can control how much you spend on your solder paste stencil. You can also make sure your solder joints work well by picking the right material for your job.
Key Takeaways
Pick the best stencil material. Stainless steel works well for big jobs. Electroformed nickel is good for small, detailed parts.
Make your stencil design better to help solder paste go on right. The right size holes stop mistakes and make boards work better.
Use the same stencil designs when you can. Using common sizes and shapes saves money and makes work faster.
Think about using nano-coatings. They make prints look better, cut down on cleaning, and help things run smoother.
Work with suppliers to get discounts and advice. This teamwork can save money and make stencils work better.
Why Optimize Solder Paste Stencil Design
Cost and Quality Impact
You need to think about cost when you work on solder paste stencil design. Good design helps you save money and keep your boards working well. When you optimize the design of your stencil, you improve how solder paste goes onto the board. This step reduces mistakes and makes your process faster. You spend less time fixing problems, which means you save money.
The size and shape of each aperture must match the pads on your PCB. If you use fine-pitch parts, you can make the aperture smaller to stop solder from bridging between pins. This keeps your boards working right. Stainless steel stencils last longer and help the paste release better. You get fewer defects and do not need to clean or replace your stencil as often. This choice saves you money, especially if you make many boards.
Tip: Following key design guidelines like IPC-7525 helps you get the best results. You can adjust your stencil apertures for special parts and make sure your process stays reliable.
Yield and Reliability
You want every board to work the first time. Optimizing your solder paste stencil design helps you reach this goal. When you use the right amount of solder paste, your parts stay in place and connect well. Uniform deposits melt evenly during reflow, so you avoid problems like overheating or empty spots in the joints.
A repeatable stencil layout means you make fewer mistakes. Your first-pass yield goes up, and you do not waste time or materials. You get more reliable boards that last longer. Customizing aperture designs for your PCB helps you meet special needs and improve assembly success.
Proper solder paste volume keeps components in the right spot.
Even solder deposits lower the risk of bad connections.
A good stencil layout boosts yield and reliability.
Best Practices for Optimizing Stencil Aperture Design
Aperture Sizing and Aspect Ratios
You can get better results by picking the right aperture size and shape. This helps you put solder paste on the board the same way every time. Good solder joints need this. When you make stencil apertures, try to use standard thickness first. Change it if your parts are very close together. Thin stencils work well for pitches under 0.5mm, but the frame must stay strong. Make aperture sizes a little smaller for outside leads. This helps stop too much solder and lowers bridging. Add rounded corners that are at least one-fourth as wide as the aperture. This also helps stop bridging. For tight groups, keep the gap between pads and apertures the same as the stencil thickness.
Area ratio and aspect ratio matter a lot. Area ratio is the opening area compared to the sidewall area. Aspect ratio is the width of the aperture compared to the stencil thickness. Both ratios help you get more than 75% of the solder paste to transfer. This gives you the best results. You can use special software to check your design. It can show how the solder paste will print.
Tip: Use important design rules like IPC-7525. This helps you line things up and get good results.
Standardization for Cost Savings
You can save money by making your stencil design the same for many boards. Using the same aperture sizes and shapes makes building faster and easier. It also means fewer mistakes and lets you buy more stencils at once for less money. Simple designs take less time to set up and give you steady results.
Pick standard stencil thicknesses when you can.
Use common aperture shapes for most pads.
Only change squeegee speed and pressure after fixing the shape.
Powder Size Selection
The powder size in your solder paste changes how well it works and how much it costs. Small powders are better for tiny parts, but they cost more and need more care. Most jobs work well with Type 3 solder paste. It is not too expensive and works well. Only use smaller powders if you need very small apertures.
Powder Type | Lower Limit of Stencil Aperture Diameter (µm) |
|---|---|
Type 3 | 225 |
Type 4 | 190 |
Type 5 | 125 |
Type 6 | 75 |
Type 7 | 55 |
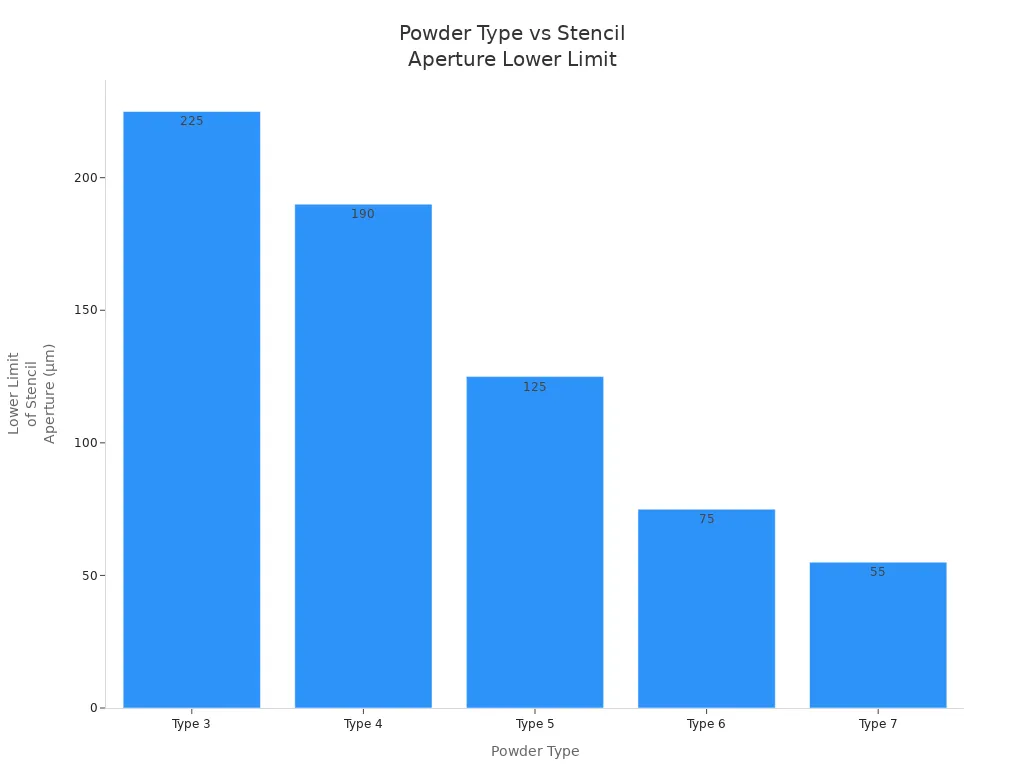
Small powders have more surface area compared to their mass. This makes them rust faster and not last as long. They are also harder to make. Only use them if your stencil needs very tiny features.
If you follow these best practices, you will get the right amount of solder paste. You will also line things up better and spend less money on your stencil process.
Stencil Thickness and Material Choices
Aligning Thickness with Component Mix
It is important to pick the right stencil thickness for your parts. Each part needs a certain amount of solder to work well. If you use the wrong thickness, you might get problems and waste money. Thin stencils are good for fine-pitch chips and micro BGAs. Thick stencils are better for big connectors and power parts. You can use a stepped stencil to have different thicknesses in different places. This helps you control how much solder goes on each part and keeps your boards working well.
Stencil Thickness (mm) | Typical Solder Volume (mm³/pad) | Ideal Applications |
|---|---|---|
0.10 | ~0.25–0.35 | Fine‑pitch QFPs, 0201/01005 chips, micro‑BGAs |
0.125 | ~0.35–0.45 | General‑purpose SMT, 0402/0603 components |
0.15 | ~0.45–0.55 | Medium‑pitch ICs, standard connectors |
0.175 | ~0.55–0.65 | Large BGAs, mixed‑technology boards |
0.20 | ~0.65–0.75 | Large passives, power connectors |
0.25 | ~0.75–1.00+ | Power components, through‑hole paste‑in‑hole |
You should follow important design rules to make sure your stencil fits your board. The smallest part pitch and aperture ratio are very important. If the aperture ratio is more than 0.66, solder paste comes out well.
Stainless Steel vs. Nickel
You can pick stainless steel or electroformed nickel for your stencil. Stainless steel costs less and works for most jobs. Nickel costs more but is better for fine-pitch parts. Nickel stencils have smoother walls and less friction. This helps solder paste come out and lowers mistakes. Stainless steel stencils last a long time and do not wear out fast. They work well for test boards and normal boards.
Feature | Stainless Steel | Electroformed Nickel |
|---|---|---|
Cost | Lower; economical for volume | Higher; premium for precision |
Performance | Reliable for most needs | Excels in fine-pitch scenarios |
Aperture Wall Finish | Straighter but rougher | Trapezoidal and ultra-smooth |
Solder Paste Release | Good for standard pitches; higher friction | Superior, low friction for fine pitch |
Durability/Hardness | High; resists mechanical wear | Higher; longer life in abrasive conditions |
Dimensional Accuracy | Excellent consistency | Good, but more variable |
Best Applications | Prototypes, mid-pitch SMT | Ultrafine pitch, high-reliability assemblies |
How hard and smooth the material is changes how solder paste comes out. Your choice affects how many boards work right the first time and how often you need to fix them.
Reducing Material Waste
You can save money by making less waste when making stencils. Stencils that last longer do not need to be replaced as much. Less waste means you spend less over time. Cleaning materials and solder paste waste can cost a lot. If you use less cleaning material, you save about $0.19 for each board. Using less solder paste saves $0.04 to $0.07 for each board.
Stencils that last longer cost less to replace.
Less waste means you save more money.
Good aperture design uses less solder paste.
You get better boards and save money when you make smart choices about stencil design and materials.
Nano-Coatings in Solder Paste Stencil Design
Print Quality and Cleaning Reduction
You can improve your solder paste stencil process by using nano-coatings. These coatings add a special layer to the stencil. This layer stops solder paste from sticking to the wrong places. You get cleaner and more even prints every time you use the stencil. Nano-coatings help you keep the aperture walls smooth and clear. This means you get the right amount of solder on each pad.
Here are some ways nano-coatings help your stencil design:
You only need to clean the stencil after every 20 prints, not after every few.
You can double your production speed. You can print two boards per minute instead of one.
Solder paste transfer efficiency can go up by 22% for small parts.
You see less bridging because less solder paste stays on the stencil.
Nano-coatings also last a long time. They do not wear off with normal cleaning solvents. You can use your stencil for thousands of cycles without losing quality. This makes your process more reliable and saves you time.
Tip: Nano-coatings help you get more consistent results and reduce the need for frequent cleaning. You spend less time stopping production to clean the stencil.
Cost-Benefit Considerations
You want to know if nano-coatings are worth the cost. The answer depends on your needs, but many users see big savings. Nano-coatings can make your stencil design more efficient and lower your costs in several ways.
Consideration | Benefit/Cost Impact |
|---|---|
Improved Yield Rates | Nano-coatings can lead to yield improvements of 10% to 70%, reducing scrap costs. |
Reduced Defects | Improved transfer efficiency reduces defects like insufficient solder and solder balling. |
Cost Savings in Cleaning Materials | Less need for cleaning materials due to improved performance of nano-coatings. |
Rework Cost Reduction | Decreased rework costs due to higher first pass yield and less time spent on rework. |
Return on Investment | Cost of nano-coating ($40) can be offset by savings from reduced waste and improved yields. |
You pay a little more for a nano-coated stencil, but you save money on cleaning supplies and rework. You also get more good boards from each batch. If you want to boost your yield and cut down on waste, nano-coatings are a smart choice for your next stencil design.
Step Stencils and Application
When to Use Step Stencils
You can use step stencils when your board has many types of components. Step stencils help you control how much solder paste goes on each pad. This improves the quality and reliability of your assembly. You get the right amount of solder for both tiny chips and large connectors. Step stencils are important for boards with mixed technology. You can follow IPC-7525B guidelines to make sure your stencil design works well.
Step stencils manage different solder paste needs across various component sizes.
You get precise control of solder paste deposition, which boosts assembly quality.
Boards with mixed component types benefit from step stencils for optimal solder paste application.
Step-down stencils work well for fine-pitch parts. Step-up stencils support bigger components.
You can adjust the aperture size in each section of the stencil. This lets you match the solder volume to the needs of each component. You avoid problems like too much or too little solder. Your boards work better and last longer.
Tip: Use step stencils if your PCB has both small and large parts. You get better results and fewer defects.
Cost Implications
You need to think about cost when you choose a step stencil. Step stencils cost more than standard stencils, but they help you save money in the long run. You get fewer defects and less rework. Frameless step stencils fit low-volume runs and prototypes. Frame stencils are better for high-volume production because they last longer.
Stencil Type | Cost for 50-100 Boards | Cost for 10,000+ Boards |
|---|---|---|
Frameless Stencil | $50 - $100 | N/A |
Frame Stencil | $150 - $250 | Cost-effective |
You can choose the right stencil for your project. Frameless step stencils work well for small jobs. Frame stencils save money when you make many boards. You spend more at first, but you get better yield and lower costs over time. You also reduce waste and improve your process.
Note: Step stencils help you balance cost and quality. You get reliable boards and save money on repairs.
Maintenance and Reuse in Stencil Design
Cleaning Best Practices
You can keep your solder paste stencil working well by cleaning it the right way. Clean stencils help you put solder in the right spots and stop mistakes. Here are some steps to follow:
Take off extra solder paste gently so you do not scratch the stencil.
Wipe the stencil with a lint-free cloth and isopropyl alcohol or acetone.
Rinse the stencil with water to get rid of any leftover cleaner or dirt.
Dry the stencil with compressed air or a soft cloth. Do not bend it.
Look at the stencil for damage or leftover paste before using it again.
If you store your stencil the right way, it will work better for longer. Keep the storage area cool and dry. Handle your stencil the same way every time. This helps stop damage and keeps your boards working well.
Always keep your stencil in a place that is not too hot or wet. Use racks to store stencils standing up, or put them flat with covers. Put a label on each stencil with the last cleaning date and how many times it was used. Be gentle when you touch stencils. Use anti-static bags to keep out dust and water.
Clean apertures help you print better and make fewer mistakes.
Good cleaning habits help your stencil last longer and save money.
Extending Stencil Life
You can make your stencil last longer if you take care of it. A stencil that is cared for can be used many times. This saves you money because you do not need to buy new ones often. Here are some ways to help your stencil last:
Clean your stencil after every use so paste does not build up.
Be careful when you handle the stencil. Wear gloves and do not bend or drop it.
Store the stencil flat or standing up in a safe case so it does not bend.
Check the stencil often for signs of damage or wear.
Use the right solder paste and set your printer to the correct settings.
If you take care of your stencil, you will not need to buy new ones as much. You will also make less waste and keep your work going without problems. When you follow these tips, your stencil will work well and help you save money when making PCBs.
Component-Specific Stencil Design Strategies
Fine-Pitch and High-Density Boards
Working with fine-pitch and high-density boards is tricky. These boards have lots of small parts close together. You need a solder paste stencil that gives you exact control. Fine-pitch stencils help you put the right amount of solder on each pad. This is important for making strong connections and stopping problems like bridging.
Try these strategies to get better results:
Pick the right aperture size for each pad. Small apertures stop too much solder and prevent shorts.
Choose the best stencil thickness. Thin stencils are good for fine-pitch parts.
Use a design that fits your board layout. This lowers mistakes and helps you make more good boards.
Follow standards like IPC-7525. These rules help you avoid common errors and make your boards more reliable.
You can spend less money by having fewer defects and less rework. A good stencil design helps you make more boards that work the first time.
Large Pads and Mixed Technology
Boards with large pads and mixed technology need special care. You might see parts with different heights and sizes on one board. This can make it hard to get even solder paste deposits. You can fix these problems by using a step stencil and changing your printing process.
Here is a table that shows common problems and ways to fix them:
Challenge | Solution |
|---|---|
Managing component height variations | Use step down stencils to change foil thickness for different heights. |
Ensuring consistent solder paste deposition | Change printing settings and use advanced stencil technologies. |
Insufficient paste volume on lower pads | Adjust step depth and aperture sizes to fix paste issues. |
Bridging on taller features | Change step shape and aperture sizes to stop bridging. |
You can also buy premium stencils with polished finishes or nano-coatings. These features help solder paste come off better and cut cleaning time. By improving your printing methods, you can lower defects and save money on repairs.
Tip: Make your aperture design better and pick the right stencil thickness for each part. This helps you balance quality and cost in your assembly process.
Avoiding Common Stencil Design Mistakes
Over-Specifying Tolerances
Some people think tighter tolerances make stencils better. But this can actually cost more and cause problems. If you ask for strict tolerances, the factory needs special machines and better materials. This makes things harder and can lead to more mistakes. You might get fewer good boards. For example, moving from Class 2 to Class 3 tolerances can make costs go up by as much as 50%. If you want tighter impedance, you could pay 10–20% more.
Impact Factor | Description |
|---|---|
Increased Complexity | Tighter tolerances require more intricate manufacturing processes. |
Lower Yield | Stricter tolerances can lead to a higher rate of defects, reducing the overall yield. |
Premium Materials | Achieving tighter tolerances often necessitates the use of higher quality materials. |
Advanced Equipment | More precise manufacturing may require specialized machinery, increasing costs. |
Cost Increase Estimate | Transitioning from Class 2 to Class 3 tolerances can raise costs by 25-50%. |
Impedance Specification Cost | Specifying ±5% impedance instead of ±10% may add 10-20% to costs. |
You should only pick tolerances that fit your real needs. Asking for more than you need wastes money and slows down work. Use normal aperture sizes and thicknesses unless you really need something special.
Ignoring Manufacturer Guidelines
Not following manufacturer guidelines can make your stencils less reliable and slow down your project. If you do not use the right aperture shapes or pad sizes, you can get problems like solder joint fatigue, parts coming loose, and broken traces. These problems can make up to 20% of boards fail in tough tests.
Reliability Issue | Design Cause | Field Failure Rate |
|---|---|---|
Solder Joint Fatigue | Undersized pads, thermal mismatch | 5–10% failure within 1,000 hours |
Component Delamination | Excessive pad size, poor adhesive | 2–5% failure in high-vibration |
Trace Cracking | Thin traces under heavy components | 15–20% failure in temp-cycled tests |
Machines stop working if they cannot read footprints or see placement mistakes.
Bad boards need to be fixed by hand, which takes longer than using machines.
Wrong stencil apertures mean you have to redesign fast and wait for new stencils.
Design errors make everything cost more. You pay extra for scrap, fixing boards, and warranty claims. These costs can be 5% of what you earn from your product. Always check the manufacturer's rules for stencil and solder paste stencil design. This helps you avoid mistakes and makes your boards more reliable.
Supplier Collaboration for Cost Savings
Volume Discounts
You can spend less money if you work with your stencil supplier. When you buy more solder paste stencils at one time, you often get a lower price for each one. Suppliers give you better deals if you order a lot at once. This means you pay less for each stencil when you buy in bulk.
You save money if you plan your orders early.
You can ask your supplier about deals for big orders.
You get better prices if you combine orders for different jobs.
Volume discounts help you keep your spending low. You can use the extra money to get better stencil designs or improve other parts of your work.
Design for Manufacturability Feedback
You can also save money by asking your supplier for design tips. Many stencil makers give advice to help you make your stencil better. They help you find problems before you start making boards. This advice makes your solder paste stencil easier to use and cheaper to make. You get fewer mistakes and better results.
Suppliers help you make your process better. They look at your design and tell you how to save money. You can stop costly mistakes and get a stencil that works for you.
Here is how different partners help you save money:
Stakeholder | Role in Cost Savings |
|---|---|
Raw Material Suppliers | Work with you to get good materials on time, which helps lower costs. |
Stencil Manufacturers | Make new ways to build stencils and change products, which saves money. |
Equipment Manufacturers | Team up with stencil companies to make work faster, so you spend less. |
You get the best results when you and your suppliers work together. This teamwork helps you make better stencils, have fewer problems, and spend less money on every solder paste stencil you use.
You can cut costs and boost quality by following smart solder paste stencil design strategies. Use industry standards like IPC-7525, pick the right material, and try laser-cut stencils for better results. Add nano-coatings to reduce cleaning. Step stencils help with mixed components. Always match aperture size to your parts and keep your stencils clean. These steps help you get reliable boards and save money. Reach out to experts if you want more ways to improve your process.
FAQ
What is the best stencil thickness for most PCB assemblies?
You should use 0.125 mm for general SMT boards. This thickness works well for most components and gives reliable solder joints. If you have fine-pitch parts, choose a thinner stencil.
How often should you clean your solder paste stencil?
You need to clean your stencil after every use. If you use nano-coatings, you can clean after every 20 prints. Clean stencils help you avoid defects and keep your boards working.
Can you reuse solder paste stencils?
You can reuse stencils if you clean and store them properly. Check for damage before each use. Reusing stencils saves money and reduces waste.
What is the main benefit of using nano-coatings?
Nano-coatings help you get cleaner prints and reduce cleaning time. You see fewer defects and improve yield. Nano-coatings also extend stencil life.
See Also
Essential Considerations For Solder Paste Quality Control In SMT
Impact Of Solder Paste Quality On PCB SMT Soldering
Effective Strategies For Optimizing SMT Lines In PCBA
Determining The Right Time For Lead-Free Solder Paste Use
Understanding Solder Paste Types And Their Component Variations