How to clean PCBA through ultrasonic cleaning equipment
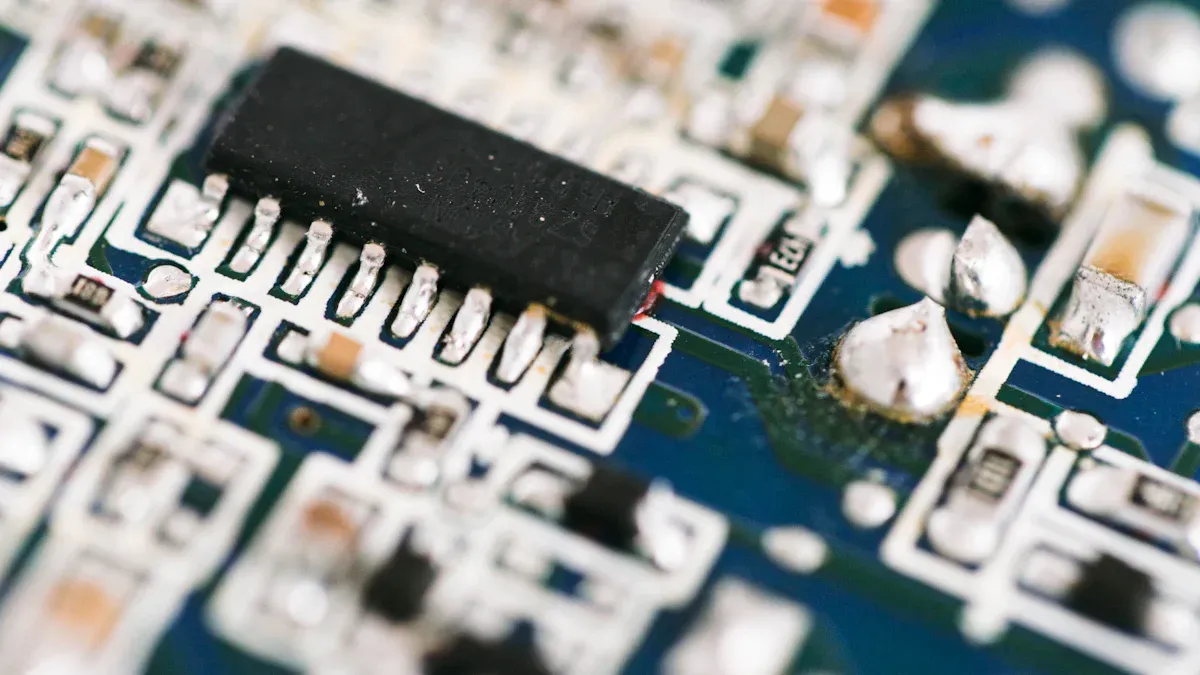
Ultrasonic cleaning is a safe way to clean PCBA. It uses sound waves to make small bubbles that clean dirt and grease. Special liquids help this process by removing dirt without damaging parts. Many companies use this method to keep PCBs working well and avoid harm.
Key Takeaways
Ultrasonic cleaning uses sound waves to make bubbles. These bubbles clean dirt and grease from PCBAs without harm.
Picking the right cleaner is important. Water-based cleaners work for light dirt, while solvent-based ones clean heavy grime.
Checking PCBAs after cleaning makes sure they are clean. This helps them work well and last longer.
Why ultrasonic cleaning is great for cleaning PCBA
Benefits of ultrasonic cleaning for PCBA
Ultrasonic cleaning has many benefits for keeping PCBAs clean. It can reach spots that are hard to clean by hand. The process uses tiny bubbles that pop and scrub away dirt. Industries like aerospace, medical, and military trust it for their strict cleaning needs. This method also removes flux and grime, helping your PCBA work better.
Common contaminants removed during ultrasonic cleaning
Ultrasonic cleaning removes many types of dirt from PCBAs. It gets rid of solder flux, grease, oil, and grime. The sound waves make bubbles that clean even tiny spaces. Using the right cleaning liquid makes it even better at removing dirt. This makes ultrasonic cleaning a reliable way to keep PCBAs clean.
How ultrasonic cleaning protects PCBA parts
This method is gentle and safe for delicate PCBA parts. The bubbles clean without damaging the board or its pieces. Unlike hand cleaning, it is quicker and safer. It works well with solder joints and circuits, lowering the risk of problems. By cleaning well every time, it helps your PCBA last longer.
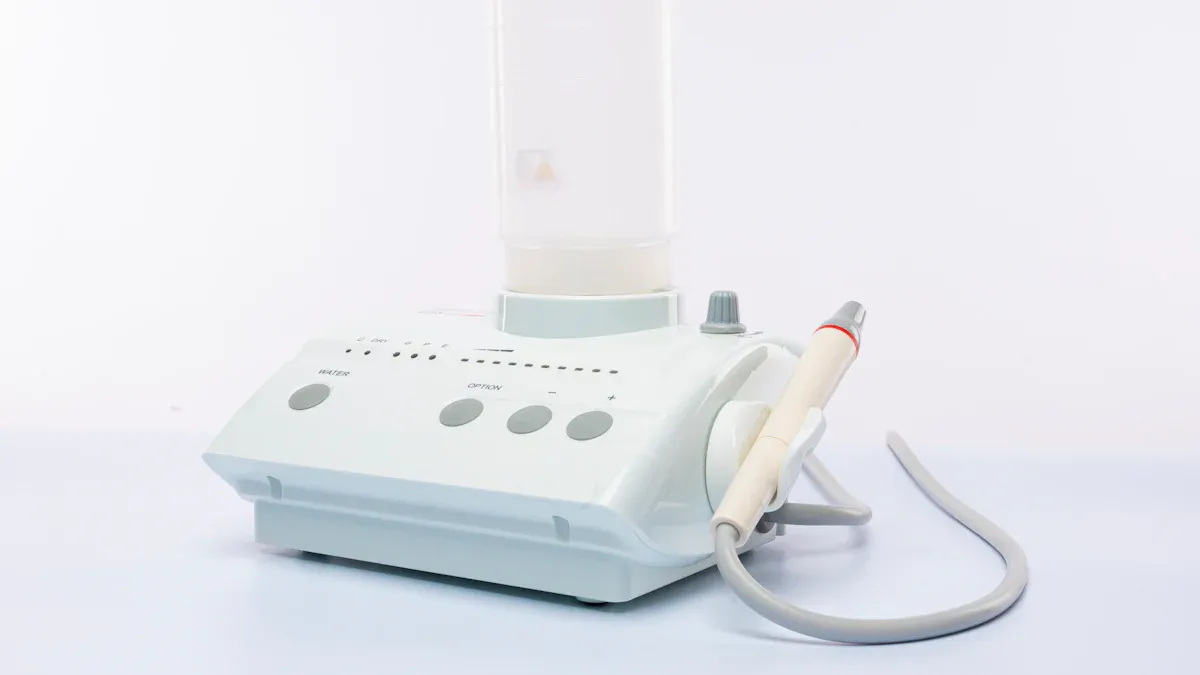
Step-by-step guide to clean PCBA with LTPCBA's insights
Safety precautions for ultrasonic cleaning
Stay safe while cleaning your PCBA. Wear nitrile gloves to keep oils off the board. Use an anti-static wrist strap or an ESD mat to stop static electricity. Static can harm sensitive parts. Fill the cleaner with deionized water and cleaning solution. Turn off and unplug the circuit to avoid shocks. Use ESD-safe tweezers to handle debris without causing damage.
Tip: Following these steps keeps your PCBA safe and clean.
Preparing the ultrasonic cleaning equipment
Set up the cleaner properly for the best results. Fill the tank with the right solution. Make sure the liquid covers the PCBA fully. Adjust the frequency based on the parts' sensitivity. Use low frequencies for strong parts and high ones for delicate parts. Set the timer depending on how dirty the board is.
Ultrasonic cleaning gives a deep clean without harming delicate parts. The bubbles clean all surfaces, even hard-to-reach spots.
Disassembling and preparing the PCBA
Take apart the PCBA carefully to clean all areas. Remove connectors or shields for better cleaning. Check for loose solder or damaged parts before cleaning. Handle the board gently to avoid breaking small parts.
Choosing the right cleaning solution for PCBA
Pick the right solution for effective cleaning. Water-based solutions like elma tec clean A1 remove light dirt, oils, and dust. For tough grime like corrosion, use elma tec clean S1. Always dilute the solution as instructed to protect the board.
Cleaning Solution | pH Level | Recommended Use |
|---|---|---|
elma tec clean A1 | 10.8 | Cleans light oils, flux, dust, grease, and fingerprints. |
elma tec clean S1 | 1.6 | Removes corrosion, lime, grease, oil, and oxide layers. |
Running the ultrasonic cleaning process
Put the PCBA in the cleaner, fully covered by the solution. Turn on the cleaner and watch the process. The sound waves make bubbles that remove dirt. Adjust the cleaning time based on how dirty the board is.
The bubbles create heat and pressure to clean without harming the board.
Rinsing and drying the PCBA
After cleaning, rinse the PCBA with deionized water to remove leftover solution. This stops contamination from dirty baths or cleaners. Dry the board with compressed air or let it air dry in a clean place. Avoid heat that could warp the board.
Inspecting the PCBA after cleaning
Check the PCBA to ensure it’s completely clean. Use a magnifying glass to look for dirt. Test for ionic pollutants with a solvent extract test. Use a Surface Insulation Resistance (SIR) test to check insulation.
Visual Inspection: Look for dirt or residues with magnification tools.
Solvent Extract Test: Test for pollutants by soaking the board in a solution.
Surface Insulation Resistance Test: Check for leaks caused by dirt under different conditions.
Careful inspection ensures your PCBA is clean and works perfectly.
Recommended cleaning solutions for PCBA
Types of cleaning solutions compatible with PCBA
Picking the right cleaning solution helps your PCBA last longer. Different solutions work for different types of dirt.
Water-based solutions: These are safe for the environment. They clean light dirt like dust, oils, and fingerprints. Mixing them with deionized water stops leftover residue.
Solvent-based solutions: These clean tough dirt like grease and flux. They dry fast and leave no residue behind.
pH-neutral solutions: These are gentle and safe for delicate parts. They clean without harming sensitive PCBA components.
Tip: Always check if the solution works with your PCBA materials to avoid damage.
Studies show cleaning PCBAs before coatings is important. Dirt from 'no-clean' flux can cause corrosion and leaks in capacitors. Clean boards stick better to coatings and work more reliably. This shows why choosing the right solution matters.
Factors to consider when selecting a cleaning solution
Think about these points when picking a cleaning solution:
Type of contaminants: Know what kind of dirt is on your PCBA. Light dirt needs mild cleaners, while tough dirt needs stronger ones.
Material compatibility: Make sure the solution is safe for your PCBA materials. Some cleaners can harm sensitive parts.
Environmental impact: Choose eco-friendly solutions when you can. Water-based cleaners are better for the planet.
Ease of use: Pick solutions that are simple to apply and rinse off. This saves time and ensures thorough cleaning.
Note: Follow the instructions for mixing and using the cleaner. This prevents damage or overexposure to your PCBA.
Avoiding solutions that may damage PCBA components
Some cleaners can hurt your PCBA or leave harmful residue.
Avoid high-pH solutions: Strong alkaline cleaners can ruin metal parts and solder joints.
Steer clear of abrasive cleaners: These can scratch surfaces and weaken your PCBA.
Be cautious with strong solvents: Solvents like acetone can melt plastics or coatings, causing damage.
Reminder: Test new cleaners on a small area first. This ensures they won’t harm your PCBA.
By choosing the right cleaner and following these tips, you can keep your PCBA clean and safe from damage.
Troubleshooting and best practices for ultrasonic cleaning
Fixing incomplete cleaning results
Sometimes cleaning leaves dirt or residue on your PCBA. Finding the issue and its cause can improve cleaning. Below is a table showing common problems, signs, causes, and fixes:
Problem | Signs | Possible Causes | Fixes |
|---|---|---|---|
Residual Flux | Flux left on the board after cleaning | Not enough cleaning time or movement | Clean longer or increase movement |
Ionic tests fail | Wrong cleaning solution | Use a solution made for the flux type | |
White Residue | White powder on the board | Poor rinsing | Rinse better with deionized water |
Component Damage | Broken or damaged parts | Too much ultrasonic power | Lower power or use a gentler method |
Ineffective Cleaning Under Components | Dirt under small parts | Cleaning solution not reaching under components | Try a method like vapor degreasing |
Corrosion After Cleaning | Rust or corrosion on the board | Leftover ionic contamination | Rinse more and dry completely |
Tip: Check your PCBA after cleaning to fix problems early.
Avoiding damage to PCBA parts during cleaning
Handle your PCBA carefully to avoid damage during cleaning. Use tools that prevent static electricity. Adjust the cleaner’s power to match your parts’ sensitivity. High power can harm fragile parts, while low power may not clean well. Make sure the cleaning solution is safe for your board’s materials. Dry the board at a steady temperature to avoid heat damage.
Reminder: Test the cleaning process on a sample board first to ensure safety.
Caring for ultrasonic cleaning equipment
Take care of your cleaner to keep it working well. Clean the tank daily, empty it, and check the detergent level. Each week, check for residue and make sure the transducers work. Once a month, replace worn parts and test how well it cleans.
Daily Tasks: Wash the tank and check the solution level.
Weekly Tasks: Look for dirt and test the transducers.
Monthly Tasks: Change old parts and check cleaning performance.
Use tools like the Ultrasonic Indicator to check cleaning quality. Regular care keeps your cleaner working its best.
Ultrasonic cleaning is a dependable way to clean PCBAs safely. Following the steps helps clean thoroughly and keeps parts safe. This method has many long-term advantages:
Cleaning many boards at once speeds up the process.
Machines handle cleaning, lowering labor costs for workers.
Reliable cleaning reduces the need to clean again later.
Gentle cleaning helps PCBs and tools last longer.
LTPCBA highlights how proper cleaning improves PCBA performance and durability. Using good solutions and smart methods keeps boards working well.
FAQ
What frequency works best for cleaning PCBA?
The right frequency depends on how sensitive the board is. Use 40 kHz for regular cleaning. For delicate parts, use 80-130 kHz.
Tip: Use higher frequencies for gentle cleaning of fragile parts.
Can ultrasonic cleaning harm PCBA parts?
Ultrasonic cleaning is safe if done properly. Adjust power and frequency to fit your PCBA's needs. Don’t clean for too long to avoid damage.
How often should you clean the ultrasonic cleaner?
Clean the tank every day to remove leftover dirt. Check the transducers weekly. Replace old parts once a month to keep it working well.
Reminder: Regular care keeps cleaning effective and helps the machine last longer.
See Also
Effective Methods for Cleaning PCB Boards Post SMT Assembly
Understanding PCBA: Key Components and Their Functions
Importance of SPI Inspection After SMT Solder Paste Application
Essential Materials Required for Successful PCBA Manufacturing