Baking Procedures for MSD Components Before Reflow

You must decide when to bake components before reflow. Moisture sensitive devices soak up humidity while stored. This moisture turns to steam at reflow temperature, causing cracks and delamination. The popcorn effect can ruin expensive boards.
Your moisture sensitivity level (MSL) rating tells you the risk. Higher MSL numbers mean greater moisture danger. Baking procedures remove trapped moisture safely. You should bake components whenever floor life expires or humidity exposure seems uncertain.
Baking requires controlled temperature and time. You must follow the manufacturer's specs for your specific devices. Skipping this step invites catastrophic failures. Understanding when to bake components protects your yield and your reputation. Proper baking prevents costly defects and ensures reliable solder joints every time.
Key Takeaways
Bake the parts when their time on the floor is up or if you don't know their history.
Use the right temperature and time based on the MSL rating and how thick the package is.
Take the parts out of the tape and reel, then bake them at a high temperature of 125°C.
After baking, the floor life starts over. Use the parts before the new time limit ends.
Why Bake MSD Components
Moisture Absorption and the Popcorn Effect
Moisture sensitive devices soak up humidity from the air while stored. The plastic packaging acts like a sponge, pulling water molecules inside. This happens slowly over time. Your component's MSL rating shows how fast this occurs. Higher MSL numbers mean the part absorbs moisture quicker and needs extra protection.
The real danger shows up during reflow soldering. Your oven heats to about 240–260°C. At this heat, trapped moisture turns to steam almost instantly. Steam expands fast, building strong internal pressure inside the package. This pressure pushes outward against the plastic casing and the lead frame.
When internal pressure beats the adhesion strength between materials, the package cracks or separates. You might hear a "pop" during soldering. This popcorn effect ruins the component's structural integrity. Even without visible cracks, moisture weakens chemical bonds at interfaces. Hydrogen bonds and Van der Waals forces break down, leaving the part vulnerable to future stress.
Risks of Skipping the Bake Step
Skipping proper baking invites trouble. Components that go into soldering without drying often suffer internal damage. The fast temperature changes cause moisture expansion that weakens or harms the package structure. This damage shortens the operational life of your devices.
The most dangerous part involves detection. Post-solder inspection rarely reveals this internal damage. You might ship weakened components to customers without knowing. These parts fail early in the field, hurting your reputation and creating warranty costs.
The failure modes follow a predictable sequence. Moisture turns to steam during reflow. Steam creates internal pressure. Pressure causes popcorn cracking, delamination, package cracks, or solder joint failure. Latent defects may not show up for months.
Baking removes absorbed moisture before soldering. IPC/JEDEC J-STD-033 specifies when baking becomes necessary. If your component exceeds its floor life, you must bake it. For example, MSL 3 parts have 168 hours of floor life. MSL 4 parts have only 72 hours. After baking, you must solder the components within a set window or return them to dry storage.
The bake process restores moisture tolerance. However, it does not reset the floor life clock permanently. You treat the component as newly exposed after baking. Following these guidelines protects your yield and ensures reliable solder joints.
Baking Requirements: Key Triggers
Your moisture sensitivity level (MSL) rating tells you when to bake. MSL 2a to MSL 5a parts need baking if their floor life runs out. MSL 2 parts usually do not need drying. MSL 1 parts have no time limit. These rules stop moisture damage during reflow. Following the right baking steps protects your yield.
Floor Life Exceeded or Unknown History
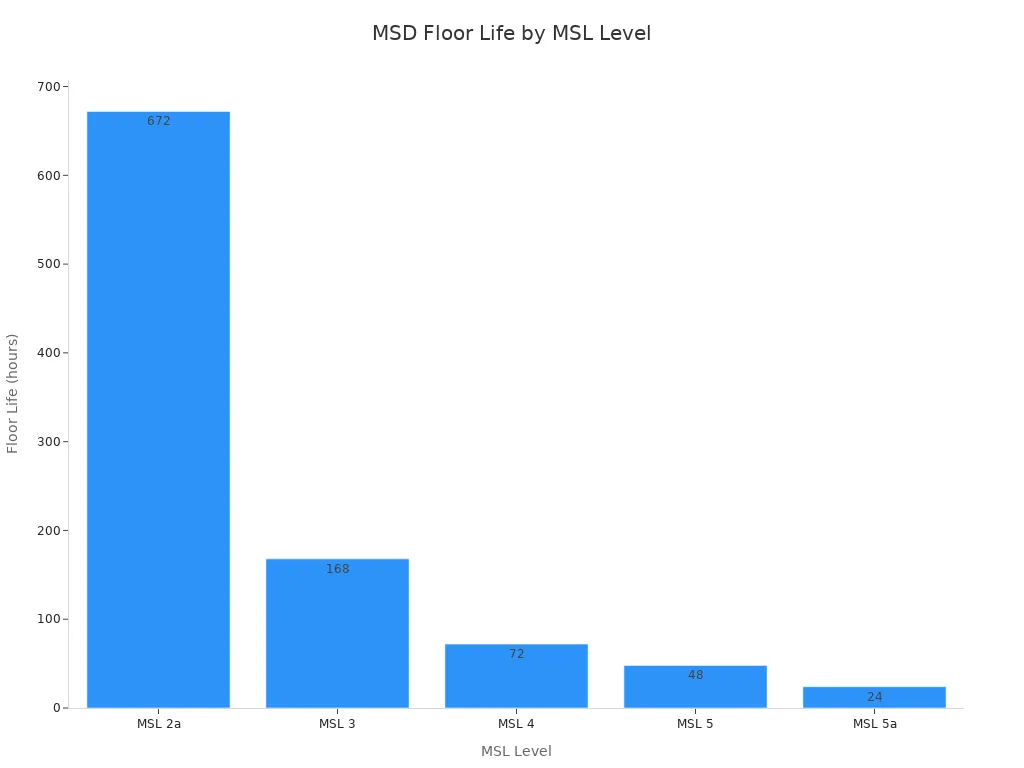
The floor life clock starts when you open a sealed bag. Each MSL level has a specific time limit. MSL 1 parts have unlimited floor life at 30°C and 85% RH. MSL 2 parts last one year at 30°C and 60% RH. MSL 2a parts last four weeks. MSL 3 parts last 168 hours, or seven days. MSL 4 parts last 72 hours, or three days. MSL 5 parts last 48 hours, or two days. MSL 5a parts last 24 hours, or one day. MSL 6 parts have no fixed floor life and must be baked before use.
The floor life does not drop evenly. The biggest drop happens between MSL 2 and MSL 3. Floor life goes from 1 year down to just 168 hours. For MSL 4 parts you have only 72 hours. MSL 5a parts give you just 24 hours. When you pass these limits, you must send the parts for baking.
Unknown exposure history is another trigger. You might get parts without proper labels. The sealed bag might show damage. Quarantine these parts right away. Keep all packaging and labels. Find any assemblies that used these parts. Get a written engineering decision before any action. Baking is not a universal fix. Only bake under an approved plan. No standard dry-cabinet or bake settings exist for these parts.
The exposure time affects your bake duration. For MSL 2a to MSL 3 parts under 1.4mm thickness, exposure under 72 hours needs a 125°C bake for 5-7 hours. Exposure over 72 hours needs 7-9 hours. For thicker parts over 2.0mm or BGA packages, exposure under 72 hours needs 48 hours at 125°C. Exposure over 72 hours requires 48-96 hours at the same temperature.
High Humidity and MSL 6 Cases
Humidity indicators give you another clear signal. Read the humidity indicator card at 23±5°C. If the 10% dot looks pink, the sealed bag has been damaged. The parts need checking for extra moisture. This requires baking for 24 hours before further work.
For unsealed humidity-sensitive devices rated MSL 3 or higher, the high-risk threshold starts above 10% RH. The critical threshold sits above 5% RH. Electronics in sealed bags face risk when humidity goes above 60% RH. These conditions need immediate action.
MSL 6 parts are the most sensitive. These parts have no fixed floor life. You must bake them before every use. The manufacturer label gives the exact requirements.
Special packaging creates extra limits. Parts in tape or tray that cannot handle temperatures above 40°C need low-temperature baking at 40°C for 5 to 68 days. Materials that cannot resist high heat, like plastic connectors, need drying at room conditions for 36 hours with humidity below 5% RH.
The baking requirements depend on many factors. Your MSL level gives you the floor life limit. Humidity indicators show environmental exposure. Unknown history forces you to assume the worst case. Understanding these triggers helps you decide when to bake. Check the moisture sensitivity level on your part labels before assembly.
How to Bake Components: Step-by-Step
Selecting Bake Temperature and Time
You need to choose the right temperature and time for your components. The common baking temperature range spans from 40°C to 125°C. Lower temperatures take much longer but protect sensitive packaging. Higher temperatures work faster. However, they require you to remove components from tape and reel first.
The package thickness and MSL level determine your bake time. Moisture takes longer to escape from thicker packages. A component with twice the body thickness needs roughly four times the bake time at the same temperature. This relationship comes from Fick's second law of diffusion. IPC/JEDEC J-STD-033D uses this as its physical basis.
Package Body Thickness | MSL Level | Bake Time @ 125°C | Bake Time @ 150°C |
|---|---|---|---|
≤1.4 mm | 2 | 7 hours | 3 hours |
≤1.4 mm | 2a | 8 hours | 4 hours |
≤1.4 mm | 3 | 16 hours | 8 hours |
≤1.4 mm | 4 | 21 hours | 10 hours |
≤1.4 mm | 5 | 24 hours | 12 hours |
≤1.4 mm | 5a | 28 hours | 14 hours |
>1.4 mm ≤2.0 mm | 2 | 18 hours | 9 hours |
>1.4 mm ≤2.0 mm | 2a | 23 hours | 11 hours |
>1.4 mm ≤2.0 mm | 3 | 43 hours | 21 hours |
>1.4 mm ≤2.0 mm | 4 | 48 hours | 24 hours |
>1.4 mm ≤2.0 mm | 5 | 48 hours | 24 hours |
>1.4 mm ≤2.0 mm | 5a | 48 hours | 24 hours |
>2.0 mm ≤4.5 mm | 2 | 48 hours | 24 hours |
>2.0 mm ≤4.5 mm | 2a | 48 hours | 24 hours |
>2.0 mm ≤4.5 mm | 3 | 48 hours | 24 hours |
>2.0 mm ≤4.5 mm | 4 | 48 hours | 24 hours |
>2.0 mm ≤4.5 mm | 5 | 48 hours | 24 hours |
>2.0 mm ≤4.5 mm | 5a | 48 hours | 24 hours |
For components still in tape and reel, you must use 40°C. This low temperature baking can take up to 192 hours for some packages. The 70°C vacuum option offers a middle ground. A 24-hour bake at 70°C in a vacuum oven at ≤100 Torr effectively removes moisture. This method does not damage tape or reels.
BGA packages and stacked die devices need special attention. For packages larger than 17×17 mm or any stacked die, the standard bake time is 96 hours at 125°C. This fixed duration applies regardless of the thickness band.
Carrier Constraints and Oven Setup
The carrier holding your components limits your baking condition options. Tape and reel packaging cannot withstand temperatures above 40°C. The plastic tape material deforms at higher heat. You must remove components from tape and place them into high-temperature trays before using a 125°C bake.
JEDEC-standard trays withstand temperatures up to 150°C. These trays stack easily and work with automated pick and place machines. Always check the temperature limits printed on your trays before loading them into the oven.
Here are the three main baking methods:
Low-temperature bake (40°C): Use this for components still in tape and reel. The duration varies per IPC/JEDEC 033B.1 Table 4-1. This method preserves tape integrity.
High-temperature bake (125°C): Remove components from tape first. Place them in high-temperature trays. This method works much faster but requires re-taping after baking.
Vacuum bake (70°C): This method works with taped components when you use proper reel support. The vacuum level should stay at or below 100 Torr. The process requires precise temperature control of ±0.1°C and low humidity below 5% RH.
Your oven choice matters for consistent results. Hot air circulation ovens provide uniform temperature with ±2°C deviation. Nitrogen ovens prevent oxidation and can shorten baking time. Vacuum ovens allow moisture to boil at lower temperatures, avoiding tape deformation. Clean room ovens with HEPA filtration suit high-reliability applications.
Remove any paper or plastic containers and rubber bands before you start baking. Maintain low humidity below 10% RH during and after the process. Let components cool naturally to below 40°C before removing them from the oven. The cumulative bake time at 125°C must not exceed 48 hours. Following these steps ensures how to bake components correctly every time.
After Baking: Floor Life Reset
Resetting the Floor Life Clock
Baking a set of components at sufficient temperature for an appropriate length of time will reset their floor life. This means you treat the parts as freshly exposed after they cool. The clock starts again from zero. You must use the parts within the new window that matches their msl rating.
Baking a set of components at sufficient temperature for an appropriate length of time will reset their floor life.
Your msl level determines how much time you have after the bake completes. An MSL 3 part gives you 168 hours. An MSL 4 part gives you only 72 hours. You must plan your production schedule around these limits. The reset does not give you unlimited time. You need to use within controlled time or return the parts to proper storage.
The bake process removes moisture from the package. However, the protection does not last forever. The plastic packaging starts absorbing moisture again as soon as you expose it to room air. You should solder the parts as quickly as possible after baking.
Storage and Handling After Bake
You must handle baked components with care. Let them cool naturally to below 40°C before you remove them from the oven. Hot parts can absorb moisture rapidly if you expose them to humid air. Keep the environment dry during the cooling process.
Store baked parts in a dry cabinet set to low humidity. This extends your usable window. A dry cabinet maintains conditions below 5% RH. Parts stored this way keep their moisture protection longer than parts left on the bench.
Document every bake cycle you perform. Your release record should include what was baked, the reason for baking, time and temperature, approval authority, and the restart time of the floor-life clock after cooling. SMT teams should log MSL exposure including open time, return-to-dry-storage time, bake time, remaining floor life, and the associated order or lot number.
What was baked and why
Time and temperature used
Approval authority and restart time
Remaining floor life and lot number
Do not overbake your components. Excessive baking degrades solderability. The metal leads oxidize and lose their ability to form strong joints. Follow the recommended durations from the manufacturer. The cumulative bake time at 125°C must not exceed 48 hours. Track every cycle carefully. Your documentation protects you from errors and ensures consistent quality.
Baking steps keep your parts safe from moisture damage. You need to bake parts when floor life runs out, humidity cards show a problem, or you don't know the history. MSL 6 parts always need baking before reflow.
Your MSL rating and part thickness decide the right bake temperature and time. Follow J-STD-033 rules. The carrier type matters: tape and reel can only take low heat, but trays can handle 125°C baking. A MSL 3 component needs 168 hours at 30°C before it needs a bake.
After baking, the floor life starts over. You must use the parts within the new time limit. Write down every bake cycle. Use a standard process. Check IPC/JEDEC standards for more details.
MSL Level | Floor Life (at ≤30°C/60% RH) |
|---|---|
MSL 1 | Unlimited |
MSL 2 | 1 year |
MSL 3 | 168 hours |
MSL 4 | 72 hours |
MSL 5 | 48 hours |
MSL 6 | Immediate assembly required |
FAQ
What happens when you skip the baking step?
Skipping the process allows moisture to turn into steam during reflow. This causes internal pressure that cracks the package. The popcorn effect ruins the component and creates hidden defects.
How do you know when parts need drying?
Check the MSL rating on the label. If floor life expired or the humidity indicator card shows pink at 10%, you must run the bake process. Unknown history also triggers the requirement.
Can you dry parts while they remain in tape and reel?
Yes, but only at 40°C. Higher temperatures would deform the plastic tape. A vacuum drying at 70°C also works with proper reel support. Remove from tape for high-temperature drying.
Does the drying process reset the floor life clock?
Yes. The drying process resets the floor life clock. Treat the components as freshly exposed. The clock starts from zero. Use the parts within the new floor life window.
See Also
Performing Reflow Soldering On Through-Hole Components After SMT Assembly
Key Requirements For Reflow Soldering Process In SMT Assembly
Critical Temperature Profile Requirements For Reflow Soldering In SMT
Methods For Testing Reflow Soldering Real-Time Temperature Curve In PCBA
Significance Of Nitrogen Reflow Soldering For Automotive And PCBA Products
